Tacoma Narrows Bridge lesson plans - Science - The Bridge challenge
The Bridge challenge
Bridge Activity and Lesson, Grades 1-4
Introduction
Washington State has more than 3,200 bridges. But that's only the number of bridges built by the Washington State Department of Transportation. Only two of those bridges are the type engineers call a "suspension bridge."
The more famous of the two is the Tacoma Narrows Bridge that is 1-mile long from where it starts in Tacoma to where it ends on the Gig Harbor Peninsula near the city of Gig Harbor. (To see the second suspension bridge, visit Yale Bridge.) By 2007, Tacoma and the people who live on the Peninsula will have another bridge that crosses over the Narrows.
Teacher-Student Discussion
What makes a bridge, a bridge? The first bridges were made 3,500 years go in Asia and Africa. People made bridges from vines and ropes and logs in order to cross over water or deep canyons. A bridge solves the problem of how to get from here to there when an obstacle makes a shorter path impassable, or unsafe.
Let's try to describe situations on land - places - where a bridge might be necessary?
How many of you have driven across a bridge? Name some bridges or places where you've seen bridges? How do you think that bridge stands up? And how can it carry it's own weight, plus the weight of hundreds of cars? Before bridge builders start to design a bridge, they consider the best type of bridge to build. Think of some things that might affect their decision.
To design the right type of bridge, an engineer must know how the bridge will be used and who will use it. The bridge builder needs to estimate how many cars and trucks and buses will drive across it, and figure out the weight of all those cars, trucks and buses. Without this information, engineers would not be able to build strong, sturdy bridges that stay put and stand up when loaded up with hundreds and thousands of pounds. But there are other things besides people and their cars that put weight on a bridge.
Let's look at The suspension bridge, again. It's a bridge that hangs in mid-air. Now, think about the weather, all types of weather. Especially cold weather. Can weather affect a bridge? What types of weather should an engineer think about as he or she figures out how much steel and concrete to use? Rain, snow and wind are three types of weather conditions that put stress on a bridge. Engineers also consider the possibility of earthquakes, tornadoes and hurricanes.
Let's think about the Narrows Bridge, again. Name the parts of the bridge in this diagram?

Not every bridge has a pair of cables like our Narrows Bridge, but the arch, the beam and The suspension bridge have five things in common. Each bridge has a deck (the road), supports (towers or piers, for example), a span (part of the deck between two towers or supports), foundations (concrete and steel in the ground) and approaches (the small piece of road just before a car reaches the bridge deck).
The best way to understand how a bridge works is to walk on it, weigh it down, or otherwise stress a bridge and its parts. Below are three activities that will show students how different amounts of weight (stress) act to make a bridge stay up, or even make it wobble and bend. This is a chance to become part of a bridge!
Overall Lesson Objective:
To show students how three different types of bridges work by rotating children through bridge stations.
Common Group Experience:
Before being divided into groups of 6 or 8, students will come together as a whole to view a slide show that features examples of the three bridge types, as well as graphics showing how the forces of compression (pushing or squeezing) and tension (pulling or stretching) affect the functioning of a bridge.
Let's move on to the bridge stations below and the necessary equipment to begin these activities in the classroom.
Station 1: The Arch Bridge
Objective:
To show how an arch bridge will sag (deflect) from a heavily weighted sandbag(s). To show what happens if the abutments on either side of the bridge are not equally weighted.
Equipment and Resources:
- Abutments - Students
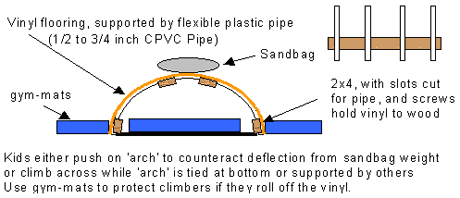
- Arch (road) - Vinyl Flooring, Lumber, Flexible Pipe, Sandbags
- Forces at work - Compression
Arch bridge supplies
In addition to the six children - two for each abutment and two who will test the bridge for sturdiness - you'll need the following:
- 36+ square foot sheet of vinyl flooring (6 ft by 9 ft, trimmed to 4+ feet)
- 2-3 - 2x4s (cut into 4+ foot lengths)
- 3-5 - 10-foot CPCV or other flexible pipe (diameter 1/2 or 3/4 inch, length 10-foot trimmed to 9 feet)
- 6 - empty sandbags
- 1 - 25 lb. bag pea gravel
- 2 - pkgs washers, screws
- 1 - roll Metal strip, wood strips, or duct tape
Building instructions
- Cut the two to three 2x4's into 4-foot lengths
- Trim the flexible pipe to the same length as the vinyl flooring
- Then use the trimmed pipe-end to mark outlines for the slots on one of the 2x4's
- Pipe goes through the slot so that it supports the vinyl, with the 2x4 holding it in place
- Mark outlines on the other 2x4's using the first as a template
- Make the slots using a saw - powered or hand - and screwdriver
- First, saw a few passes about the same depth as the pipe diameter, then use the screwdriver to wiggle the remnant wood loose
- Space the 2x4's evenly, and screw the vinyl onto the 2x4's over these open slots or channels
- Screw a metal strip (similar to that used to hold a water-heater next to the wall) or wooden strip to the outside 2x4's (prevents pipe from moving after assembly)
TIP: When ready to assemble, slide the flexible pipe into the slots, support at the ends; lift the flooring in the center to create an arch. When you're done with the lesson, remove the pipe and roll the flooring up to store.

Hands-on exercise:
Using their weight students show how they can counteract the sagging by pushing on the outer ends of the bridge, or by sitting with their backs against the arcs.
Station 2: The beam bridge
Objective:
To show how weight on an unsupported beam can cause the bridge to wobble and sag (deflect).
Equipment and Resources:
- Abutments - Concrete blocks
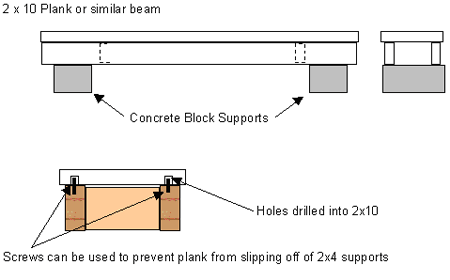
- Beam (road) - 8-foot long 2x10 wood plank, 2x4 supports.
- Forces at work - Compression (Students as cars)
Beam bridge supplies
In addition to the six to eight children who will become vehicles atop the bridge deck, you'll need the following:
- Concrete blocks, 8" x 8" x 8" OR 8" x 8" x 16"
- 1 - 8-foot long, 2 x 10 wood plank
- 2x4s as supports, Nails or screws, Wood glue, Paint stirring sticks
- Bucket with weights
Building instructions:
- Make a frame using the 2x4's
- Lay two 8-foot 2x4's parallel, and about 8 inches apart
- Join 2x4s using some spare wood material so that the frame is narrower than the 2x10 plank
- Insert 4 screws, or double-headed nails, so that the screw sticks up about 3/4 inch
- Drill holes into one side of the plank so that when lowered onto the frame the screws keep the plank from sliding off
- Assemble by using the Concrete blocks as foundations
- Place beam on the blocks and off the floor or ground
- Alternately, place the 2x4 frame on the blocks, and set the plank onto the frame
TIP: Students could glue paint stirring sticks together as H-beams, or any other shape (look at beams around your school). Let the glue dry, and test using a 5-gallon bucket and weights (books, rocks, etc.). Support the beam between two tables and load until it breaks.

Hands-on exercise:
The bridge's weight is supported by the abutments. Children will take turns walking over the plank (roadway) to see what happens to the beam with and without supports. Load the bridge with two, and then three children at one time. Watch what happens to the bridge, again, with and without the supports.
Station 3: The suspension bridge
Objective:
To show how a suspension system works by using children and the stress they exert on sisal rope ropes to personify the anchorages of a bridge. By putting equally weighted children on either side of the towers (ladders) students will learn how tension on the cables and massive Concrete blocks support the cables and distributes the weight of the bridge. (Suspension bridge Cable system is like a game of tug of war.)
Equipment and Resources:
- Anchorages - Students
- Cable system - Sisal rope, ladders (towers), pulleys, PVC pipe, bamboo, large spools
- Foundation - Sandbags
Suspension bridge supplies
In addition to the six or eight children who will become the bridge's anchorages, you'll need the following:
- Sisal, manila, other - diameter dependent on strength of kids!
- 25-ft. lightweight rope - lightweight rope laundry type
- 8 or 12-foot tall step-ladders
- Pulleys (or large plastic spools used to hold cable wire)
- 1-2 - bamboo rods or 1" diameter PVC pipe. Trim into 4" inch pieces. In lieu of bamboo for handles, have children wear gloves.
- 4 - 25 pound bags of pea gravel or sand
Building instructions:
There are a number of ways to do this, and guidance is available in the Boy Scout merit badge book for Pioneering (see Monkey Bridge). A simple bridge uses one 'rope-cable,' either twisted sisal/manila rope or nylon/poly rope (1/2 to 3/4 inch in diameter).
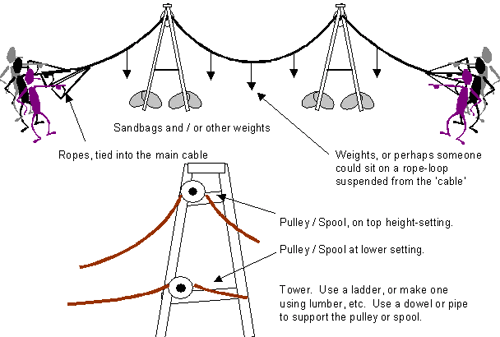
- Pass the main 'cable' is over pulleys that are suspended under the ladder tops with rope (TIP: Secure these connections by wrapping a rope around the ladder top to prevent slippage)
- Main 'cable' is looped at both ends (via eye-splice, bowlin knot, etc.)
- Ropes (laundry) knotted to this main loop serve as the splayed portion of the cable inside the anchorages (children personify the anchorages)
- Attach the small PVC pipe pieces or bamboo to the ends of the laundry rope as hand-holds for the kids (think water-skiing)
- Finally, afix weights to the rope (see diagram) so that the children when pulling as if in tug-of-war, lift the weights just like a suspension bridge supports traffic
TIP: For a more complex bridge use several lengths of smaller rope, compressed next to each other much like the wires in a cable in a real suspension bridge. These lengths would then spread out at the ends to the anchors, with no need for a loop.

Hands-on exercise:
First, use the top setting on the towers (shown below). Then, switch the saddles (spools) where the rope goes over the top of the tower to the lower setting. Does one height require more force to support the same amount of weight?